We arrived at Bonita Springs, FL on the first of the year, planning to stay here for a full month – the longest stop of our adventure so far. Steve had a list of minor “Betsy” maintenance and fix-up to-do’s, and we thought this would be a good place to complete them.
One item that was not on the list – replace our refrigerator. We have never been comfortable with the complexity or performance of our absorption unit, and Steve had been studying the feasibility of replacing it with a residential refrigerator for several months. But now the issue had become a high priority, as our current fridge was obviously getting warmer and likely to fail soon. After adding extra fans and defrosting the thing multiple times, we had two experts check it out and they advised us that we would need a new cooling unit – at close to $2,000 for the CU (either Norcold or an Amish unit) and labor. Decision time!

Although we haven’t boondocked a lot so far, we didn’t want to lose the ability to do so. And that was really our only opposition to moving to a residential fridge. Since we have a good inverter and 3 coach batteries, plus our trusty generator, we think we’ll be able to make it work.
Being the handyman he is, Steve decided to take on the job himself. He would have tackled this without hesitation before we started full timing, but now he was limited by a lack of tools and wondering whether the RV park would allow it. As luck would have it, we are at Imperial Bonita Estates RV Resort, where construction within sites is allowed and the resort workers even haul away any debris left by the street once a week. There’s also a Home Depot right up the street for needed parts and tools. Let’s get to work!
Steve measured all dimensions of the old fridge, the compartment that held it and our door opening (the only window large enough to get a fridge through is the emergency exit in the bedroom – not an option). We located a unit at Home Depot that looked good, a Frigidaire model# FFHT1817PS. It was slightly narrower in width at 30″, but taller at 66.5″ – meaning we would lose the drawer that was under the old unit – darn! The depth of 30″ meant it would stick out of the wall slightly, but not too bad. The weight was about the same, around 200 lbs. We ordered the new fridge, ate everything in the freezer as fast as we could, emptied all of the remaining goodies into ice chests (thanks Joe and Judy for loaning us yours!), and Steve got busy.
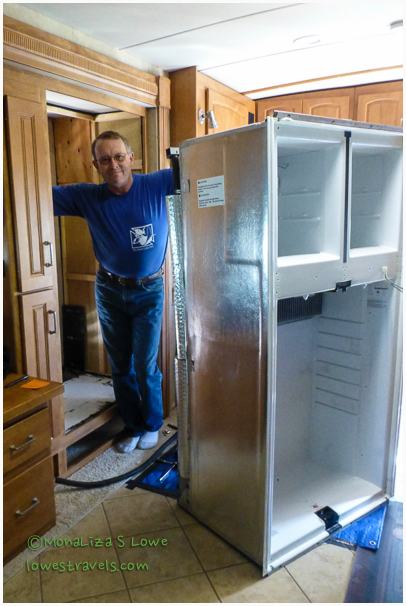
After removing the doors and hinges, disconnecting the propane, ice maker line, 12V and AC power, and removing everything that looked like a retaining screw at the front/back/top/bottom, he happily yanked the old unit out:


The next step was to get rid of the old bracing and other stuff in the fridge compartment to prepare it for the new unit. Steve plugged the end of the propane hose, since there was no access to the metal gas line under the coach where he would have preferred to plug it. He moved the electrical outlet from the rear of the compartment to a brace on the side wall to give us a little more depth – the new unit needs only one inch at the rear for ventilation. Fortunately, the outlet was already connected through the inverter so no additional wiring was required.
The new fridge was tall enough that even though we lost our drawer at the bottom, a base had to be built to get it at the correct height in the opening.
Steve knew we wouldn’t need both outside vents, so he sealed the top one from the inside with sheet metal attached with sealant and screws. We’re not sure whether we want to seal the bottom vent or not and will decide later. On hot days we think it might be good to have some outside air flow, but the new fridge has a vent on the bottom which is open to the inside of the coach. That will allow some outside air into the coach, but we will monitor it for a while to see if it’s too much. If we find the bottom vent isn’t needed, we’ll fill it with spray foam and close it back up to seal it.
Delivery day arrived, and it was time for Steve to “clear the runway” for the landing of our brand new baby. He removed the passenger’s seat but left the base in, since he wanted to avoid pulling up the carpet to remove it and he thought the delivery folks could work around it. Next, he removed the grip handles on both sides of the door to make the opening as big as possible. Finally, he unscrewed the door stop at the top to allow the door and screen to swing completely out of the way. Now we had a 28″ door opening to get the 27″ deep fridge through, once the doors were removed – no problem!

Steve was horrified when the delivery guys told him they were not allowed to deliver appliances into motorhomes or boats. We pretty much begged them to help us out – these old people in the RV park can’t help us move a refrigerator! By a stroke of luck, Steve happened to have some $10 bills in his hand as they were getting ready to leave and the guy saw them. That did the trick! Those guys had the old unit out of Betsy and the new one sitting in the galley in no time flat! They told us they weren’t supposed to do it, so we carefully disguised their faces in the above image 😉
Back to our story, we slid the unit into its new home and Steve took careful measurements for the upcoming trim project. Then he installed the doors and I put the shelves where I liked them. We plugged our new refrigerator in, put a box of baking soda inside, and waited in anticipation.
Figuring out how to secure the fridge took some thinking, since there was very little access to the back and we didn’t want to put any screws into the unit – which would likely void the warranty if we have any future problems. Steve decided to install the trim around the fridge with a strip of super-strong double-sided tape, then screw the trim into the cabinetry. The guy at the hardware store thought it would work, and wow did it ever – this thing doesn’t budge a millimeter!
After two days of work and about $850 for the refrigerator and other parts, it’s just about done:
We love all of the space in this fridge, and we’re in the process of putting various storage trays inside to keep things from falling as we travel. Steve still has to devise retainers to keep the doors closed on the road, but he’s found some ideas using velcro that look simple and unobtrusive. He’s filling the screw heads with wood putty now, and after a final coat of stain on the trim it looks like we’ll call this one a success!

Before starting this project, we talked with several people who had either performed a similar transplant, or who owned newer coaches that came with residential refrigerators. One couple who had done the transplant were John and Pam of Oh the Places. Since they were staying nearby, we were able to visit them to pick their brains prior to starting our project. Once we were done, they were nice enough to come over and do a “final inspection”. I think we passed!


I follow your blog which I got from Island Girl and I would like to add my wife at “pkirkwoodirvine@gmail.com”
We met Hector and Brenda in San Diego over the winter and we just visited with them again in Banff last week. We live in Calgary and they were passing through. I have just switched my blog from Blogger to WordPress and they have been giving me a hand.
Doug Irvine