This project was originally published as a guest post at Wheeling It on Sept 2012. Thank you Nina for showcasing this easy RV mods in your blogsite.
This is Steve’s description of the water manifold project he completed on Betsy –
I performed this modification after reading about a similar project in Motorhome magazine. It’s a low-cost way to make freshwater management easier, if you face the same issues we do as fulltimers who hook and unhook our utilities often:
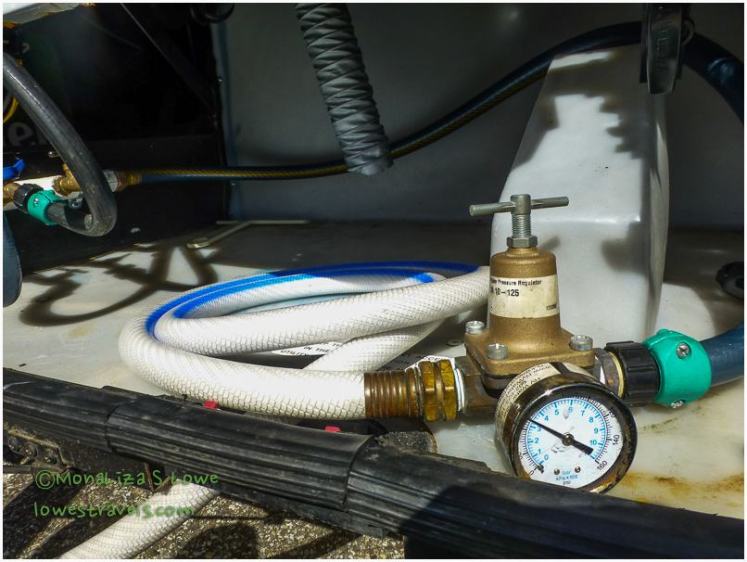
- To avoid possibly forgetting my regulator at the park, I wanted to move it into my RV’s compartment. This puts it closer to the system it’s regulating and gives more accurate readings, and eliminates having to install the regulator on a faucet at every stop.
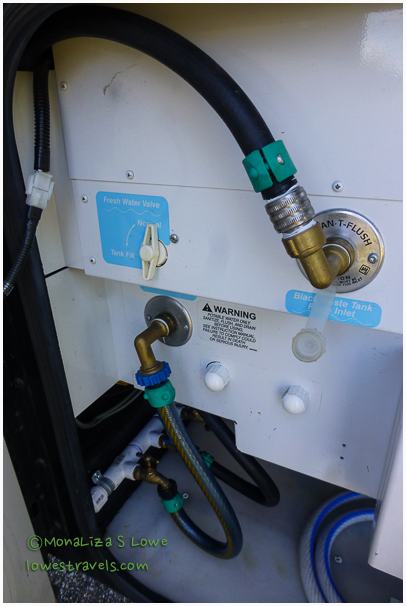
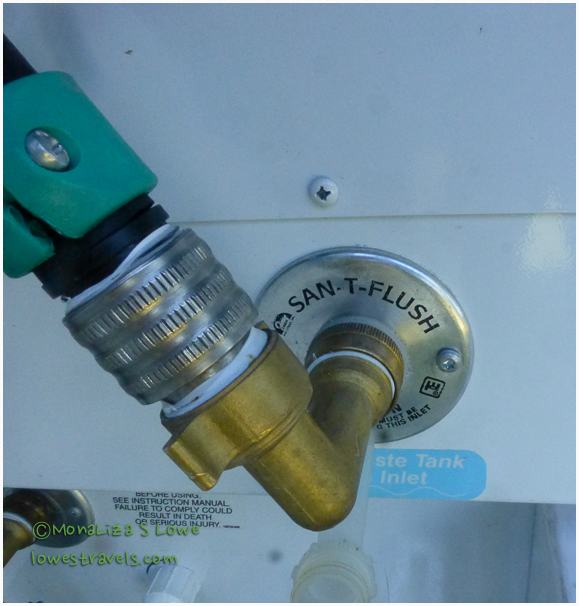
- I didn’t like the hassle of moving my hose between the system intake valve and black tank flushout valve when I needed to dump the tank.
- I wanted to have an extra “bib” available so I could connect a hose to wash the RV or do other tasks.
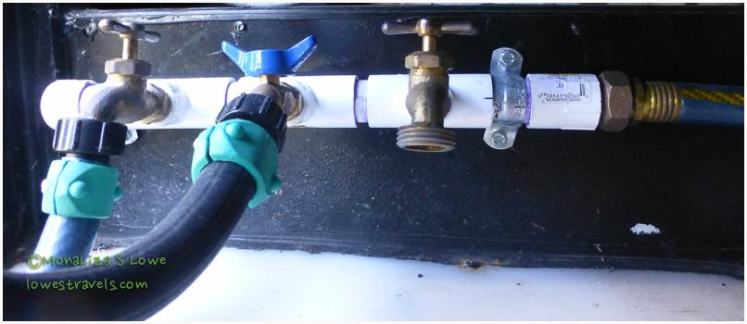
For these reasons, I made up a manifold out of 1″ PVC pipe and fittings, inexpensive and easy to do. I used three 1-inch “slip T” fittings with female threads for the three 1/2″ faucets. Using small sections of 1″ pipe between the slip fittings, I primed and cemented them together, then put a cap on one end of the manifold. The other end was completed with a female threaded fitting that allowed a male hose end to be attached via a brass adapter. All of these parts and the plastic ends I used on the hose sections can be found at any hardware store.
I ran a short section of hose from the regulator output to the manifold. You can see in the photos that I cut up an extra hose to attach everything using the plastic hose ends, which are fine for the pressures involved here.


The regulator is a Watts 263A, which has high flow capability and is adjustable – nice unit. I bought mine at rvwaterfilterstore. I intended to mount it in the compartment, but discovered it’s nice to be able to move it so I can let it drain onto the ground when removing the inlet hose.

When connecting at a campground, with all of the faucets shut off I can turn the park’s water on “full blast” without worrying about excessive pressure, since the water goes only to the manifold at that point. After adjusting the regulator, I open the faucet to pressurize the RV system. When dumping my black tank to depart, I shut off the faucet to the RV system, turn on the freshwater pump, then open the faucet to the tank sprayer as needed. I shopped around a bit to get good quality, high-flow faucets that would cause the least flow restriction in the system.

NOTE: Although my RV came with a check valve in the black tank to prevent black water from coming out of its hose inlet, I installed an additional one just prior to the inlet to be sure. The check valve is also available at rvwaterfilterstore for about $15.00.

If you want your setup to look really cool and you have the money and tools, plumbing supply stores sell copper manifolds that can be used – but you’ll have to do quite a bit of soldering to put everything together. It was a bit more than I wanted to take on for this project.
A separate point regarding water filters – I suggest using the ones that filter at 5 microns, NOT .5 microns. Although it seems .5 would be better, those filters are very restrictive and clog up quickly. We experienced low water pressure very soon after installing a .5 unit, and we’ve had no problems with the 5 micron filters, replacing them every 3 months.
Good luck!
On the subject of Mods. We have a ways to go before we head out on the road….a couple of years to sell the business and go. In the mean time, I think a lot. We plan on putting a composting toilet in our new fifth wheeler and so will have a black water tank to use. I want it for more water. Do you know anyone who has done this and do you see any major issues in the way of doing it?
Warren,
I’ve never seen it done, but I suppose the issues would involve transferring water in and out of it, and making sure the tank vent will not allow debris and bugs to enter – since the black tank vent is usually large and runs up to the roof. Depending on its location with respect to the fresh tank, you may be able to fill or empty it using gravity in one direction, but not both. A pump would probably be required, and of course a transfer line.
These are just thoughts – please don’t rely on them. I suggest locating an excellent RV repair/modification facility for advice on this, even if you plan to do the work yourself. There may be materials in the black tank or its plumbing not suitable for fresh water. Sounds like an interesting project, though – let me know what you find out!
~Steve
I would not convert a black tank to a potable water tank for several reasons. The first are the reasons mentioned, as the tank is vented to the roof and is probably not made of potable material. I don’t believe you could ever get that tank clean enough once used as a black tank, so replacing it with a potable tank that does not vent to the roof would be the only way around that issue. But also the total quantity of water, potable and disposable needs to be in balance. The spec’s for the MH I am considering have a 92 gal fresh, 62 gal black and 52 gal gray. If you add 62 gallons of fresh water, where will it go? Your gray, in this example will still only hold 62 gallons. So you already would have an excess capacity of 30 gallons of fresh water with no place for it to go you would still have to hit the dump station when the gray is full. Of course you could just take a lot of showers outside to make up the difference, but once you add 62 gallons more fresh water, that’s a lot of outside showering.
Another idea would be to use the black tank as an additional gray tank. Now your capacity for gray is 114 gallons and you have plenty of room for extra water. An extra valve is used to shut off the black/gray tank at the dump valves. Close it and open both black and gray to equalize them. You would not need to replace the tank or get rid of the vent. On resale the only mod to deal with is the composting toilet. You can bring extra water containers easily hauled from you last stop prior to boondocking or obtained later by taking your tow vehicle or towed.
This is not my idea, I saw it done by the Wynns from the Gone with the Wynns site.
Thanks for the reply. I’m sure I will not really know, until I dig into the real setup. I agree that unless there is something in the tank that would be toxic, I see no real reason why it can’t be done. The likelihood of the manufacturer using different types of adhesives, etc to assemble the tanks would not make much sense but, who knows. I’ll check with a couple of manufacturers and see what they say.
Warren
I am curious why you didn’t install the free hose bib on the outside of the manifold, as that is the only connection you are going to need to install and remove a hose regularly.
Actually, we don’t use the free bib very often, but we do turn the others on and off constantly so I wanted to put them within easy reach.
Kitchen water faucet flow stopped although all 3 bathroom outlets flow unrestricted as always. Removed and cleaned strainer on sink fixture but no increase in water flow. What could cause loss of flow on a single fixture. Problem same using fresh water tank (pump) or on city water
See if there’s a second strainer within your faucet assembly. My faucet has a standard aerator, which is what I’m guessing you cleaned. But it also has a pullout head, and where the hose attaches to that head is another built-in strainer that I need to clean periodically with compressed air and a paper paperclip to get out small pieces of minerals. Hope that helps!
~Steve