My guest writer (Steve) is geared up to write a Betsy maintenance story, so I told the birthday boy to fire away. My birdwatching tale will just have to wait a few more days…here’s a project Steve recently completed:
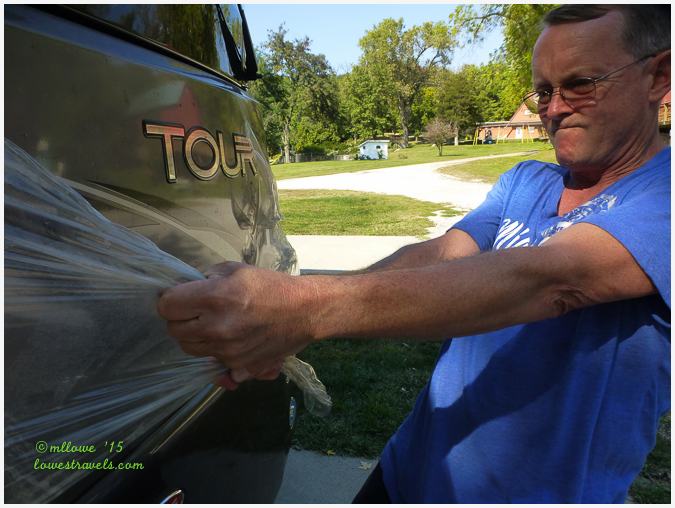
If your RV didn’t come with a clear protective film on the front, or if the protective film on your RV is still in good shape, this article is not for you. But if after a few years and a few miles of travel you are noticing pitting and discoloration that’s making you consider removing that film, you may want to read on and see how I “got ‘er done” – after lots of research and multiple attempts with several different products.
This protective film has been called “Scotchguard Protectant Film”, “3M Rock Guard” and “Diamond Shield”. I don’t know if these are different names for the same product, or even which one was applied to our 2008 Winnebago (no indication on the invoice). I hope some of the details below will help folks, no matter which protective film they are dealing with.
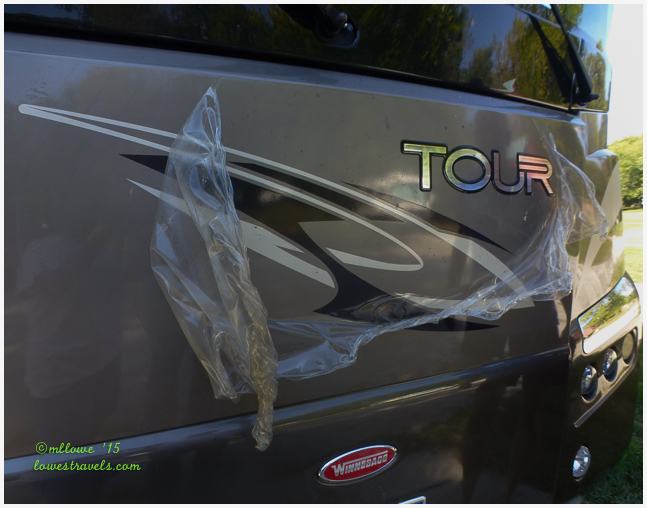
I’ve read about and seen this protectant film in various stages of deterioration, and I’ve heard horror stories about how it just chipped off in little pieces when folks tried to remove it. The film on our coach wasn’t too bad after 6 years of use, and with some muscle power I was able to get it off in large pieces. Another procedure would probably be needed if yours has completely disintegrated. Best of luck to you if that’s the case!

As some of you may know, getting the adhesive removed after pulling the film off is the real project. I tried paint thinner and then acetone to dissolve the nasty stuff, neither of which worked (and believe me it scared the heck out of me to rub acetone onto my nice paint job!).
The product that did it for me was Xylene, which evaporates more slowly than the others and seemed to soften the adhesive quickly. I was able to get a quart of Xylene at my local Ace hardware store.


I found that doing this work in the shade worked best. I thought the adhesive might get soft and come off easier in the sun or heat, but the Xylene evaporated too quickly to do its job in those conditions.
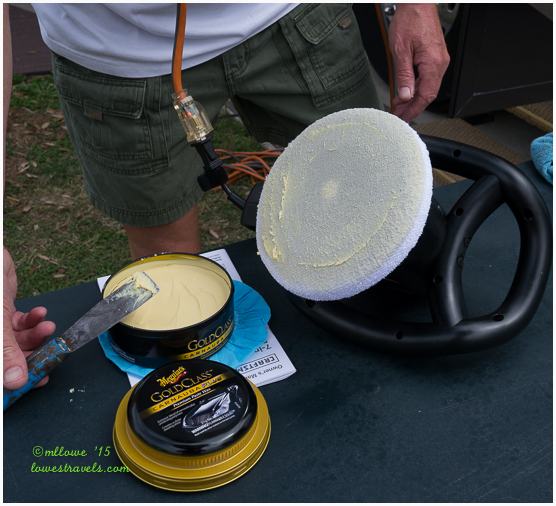
Using a cotton rag saturated with Xylene, I generously spread it on a small section of the adhesive, then after a few seconds I could scrape it off fairly easily with a PLASTIC “razor” blade without damaging the paint. Although I used to paint cars many years ago, I had never heard of these plastic blades and soon discovered they were essential for this project and can also be purchased at Ace.

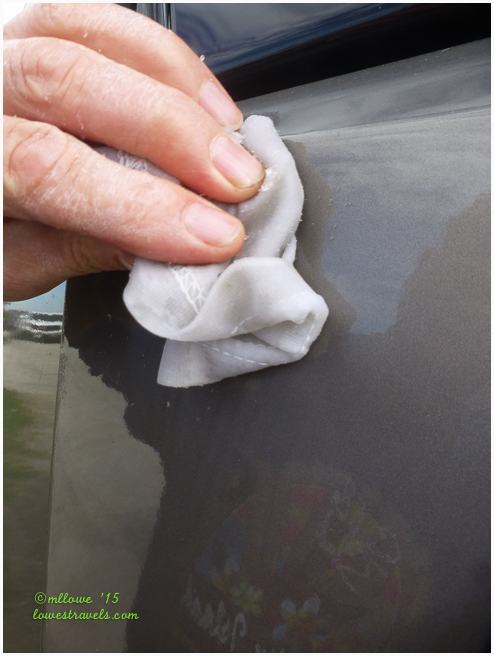
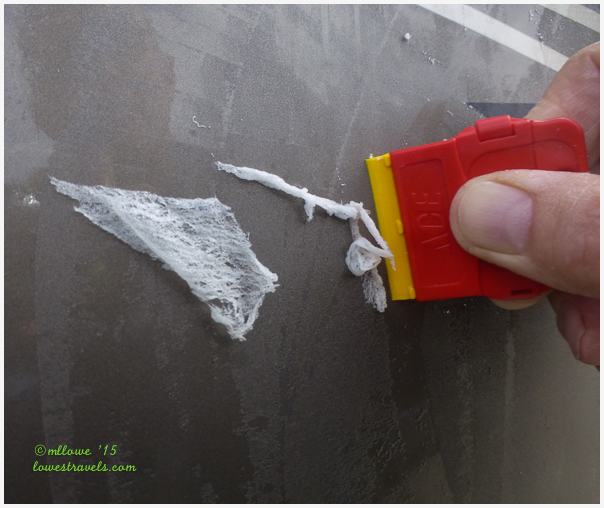
After scraping off the adhesive, there were small trace amounts of it left behind that could be wiped off with a little more Xylene. After completing each section, I flooded the area with water to dilute any chemical remnants that might possibly damage the paint.
Plan on spending several hours to completely remove the adhesive. It probably took me 4-6 hours once I had figured out the right combination of chemicals and tools. After that, I broke out my trusty orbital buffer and applied a nice coat of wax to make the front of the coach shine like new.

I learned that professionals will charge $300-$600 to do this for you, so I felt pretty good about doing it myself, even though it took a few tries to get it right.
Tools/products needed:
- Muscle to remove film
- Xylene
- Plastic scraper blades
- Rags and fresh water nearby
- Buffer
- Good liquid or paste wax
- Patience!
Good luck, and let me know if you have any helpful suggestions to make this project easier for other folks!
~Steve

Now that does not look like a fun job…but it turned out beautiful! Good work!
Hi Lisa,
You are right – not fun but glad it’s done!
~Steve
What an awful job, Steve! Question: is your birthday Feb. 22? I’m celebrating my 2/22 birthday vegging out by the fire with a good book. You are a lot more industrious than I am! It’s wet and foggy out here, and the temp is low forties. Not real condusive to outside work.
Hi Holly,
It looks like we share a birthday – yes mine is the 22nd! I had finished
this project about a week before this posting, while the weather was nice.
You’re right, not much fun doing something like this during bad weather,
I’ll take the book in front of the fire too!
~Steve
Happy Birthday, Steve!! What a wonderful birthday present from Mona Liza…you came before the birds:)
That was a tough job. You were so brave to try those products on that beautiful MH! The end result looks perfect. Great reflection!
Hi John and Pam,
Thank you for the birthday wishes! We actually spent my day at a wildlife
center near South Padre Island, so I’m still not sure if I get priority over
the birds or not 😉
But we did have a fabulous fresh seafood lunch, and that was just for me!
I hope you’re having some good weather there in AZ, I can’t wait to get back
out that way.
~Steve
That is a job I would have been afraid to tackle. Looks like you did a fabulous job Steve. Happy birthday! 🙂
Hi LuAnn,
Thank you for the birthday wishes! Yes, this was one of those jobs
that was really nice to get off the “to-do” list. We have another
week to complete just a few small tasks, then back on the road again
for our next spring/summer/fall adventures!
~Steve
Good job, Steve! Happy Birthday. 🙂
Thank you!
~Steve
Happy Birthday Steve. Sure glad we never had that stuff in the first place.
Thanks for the birthday wishes. And I’m glad you never had it either – we
never will again!
~Steve
Steve, you are without a doubt one of the most motivated and patient people I’ve ever met! It drives me crazy just trying remove the adhesive left behind from a price sticker. Those plastic razor blades are a great idea. Great job! 🙂
Hi Laurel,
Thank you for the birthday wishes. You know, I can’t stand those price
stickers either – what’s up with that? Would it kill them to use an
adhesive that peels off easily? Don’t get me started!
Take care and say hello to Eric!
~Steve
Oh — and happy birthday! I’m hoping you got to do something fun for your birthday. 🙂
Happy Birthday Steve, nice job and glad it wasn’t your Bday punishment 🙂 I take it you don’t plan to have new film put on? I’m certainly not wanting it on my next RV after reading this post. Cheers!
No, never again for us. I would rather deal with occasional touch-ups for
any really bad spots. Our coach came with it installed, so we didn’t have
any choice then, but I certainly wouldn’t recommend that anyone have it
installed. Take care!
~Steve
Happy belated birthday Steve…Job well done! We are quite impressed…
Thank you, I just hope it isn’t a job you will have to do…
~Steve
Nice job, Steve!
Timely information – thanks. We’re gearing up for our trip to Alaska this summer and were considering 3M™ Paint Defender Spray Film . May need to reconsider.
If you are driving a motorhome and towing a car, I think you should be much more
concerned about the car. The best way to protect your RV if going to Alaska is to
simply GO SLOW in areas where the road is not paved, or where the frost heaves are.
You’ll learn about them soon enough. When in gravel areas of the highway, we
actually pulled over and stopped when trucks or other vehicles were coming at us
fast. We had no problems. Good luck on your adventure!
~Steve