[Steve wrote this post, Mona Liza gets the day off!]
Like many full-time RV’ers running around the country, we tend to slow down and “stay put” in a particular area during the coldest winter months. We have found it’s the best time for us to complete the many little maintenance items we’ve added to our list during the more intense travel months.

This is our third winter on the road, and as you know Texas is this year’s state of choice after spending the winters of 2012 in Arizona and 2013 in Florida. Our current list of “to-do” items is many, but the number of decent weather days to do them has been few! I had planned to complete everything by mid-January, but it was not to be due to several weeks of cold, windy and wet weather. Thanks to better days here at Riviera, TX I’m just about back on schedule.
Note: If you don’t own a coach or full-time you may want to skip this post!
So, here’s how I’ve been spending my time while Mona Liza terrorizes the local bird population:
Installed new batteries –
My highest priority regarding mechanical maintenance was to replace all of our batteries – coach and chassis – after 6 years of constant use. We purchased the new ones as soon as we arrived at Port Aransas, since there was a major Interstate battery warehouse just down the road in Corpus Cristi, and those were the batteries I wanted. You should have seen our poor car sagging in the rear as I hauled over 350 pounds of batteries home!
Except for the physical workout of hauling 5 new batteries home and 5 used batteries back to the warehouse, this wasn’t a tough project. I photographed and took notes of the cable connections, then disconnected the main cables from each “group” of batteries to the coach and chassis. After that it was just a matter of removing the cables that made up the parallel connections between the batteries and then removing them.


I scraped and then cleaned the trays with a water/baking soda mixture, then applied a rust inhibitor where needed before painting everything a nice satin black. While that dried I cleaned the cables and hold-down brackets. Finally, I put those shiny new ones in and hooked everything back up.
Some tips (certainly not exhaustive):
- Don’t even think about doing this job without wearing safety goggles!
- Wear the junkiest clothes you own, then throw them away when you’re done. The battery acid will eat them, and I wouldn’t want to put them into anyone’s washing machine.
- Always disconnect negative cables first, and reconnect them last, to avoid accidental arcing with your tools.
- Use a good-quality steel brush to clean all cable connections.
- Vaseline on the connections works well to reduce future corrosive buildup.
Re-carpeted our entry steps –
A no-brainer, and an easy project on a nice day. Some contact cement and a brush to apply it with, and some good quality outdoor carpet of your choice. After measuring carefully, I folded ours over the front of the steps and held it down with some metal doorway trim.


Insulated our indoor cabinets –
Well, here’s one we could do on a cold, miserable day! Also a great time to go through all of our “stuff” and clean the cabinets. I added about 1/4″ to my measurement in each direction to create an “interference fit”, and then stuck a couple of small double-sided tape squares to the back just for extra hold. We haven’t had a warm enough day to test the benefits yet, but I think it actually looks pretty cool! We got this idea from John and Pam when we checked out their installation.


Lubed the chassis –
Probably my most dreaded maintenance project – cramped, greasy, filthy job. I was happy to have an image of all the grease points in the binder I got from my Camp Freightliner class. There are several that aren’t at all obvious, including at the rear of the chassis. And make sure to get the ones on the drive shaft u-joints. One thing that helped me this time was having the front end of the coach jacked up quite a bit because the site wasn’t level. It gave me much more room to crawl around.


Installed Eternabond tape on the roof –
I finally got a nice enough day to check the drip rails along the sides of the roof, and attention was definitely needed. Rather than trying to remove all of the old sealer and replace it with new (which I’ve heard several times can result in new leaks), I bought 2″ Eternabond tape and sealed from the roof to over the lip of the drip rail. I used sandpaper to roughen up the drip rail, then blew away any dirt before cleaning the area with lacquer thinner.


The edge of our roof is black, so I got the black tape to make it less noticeable (it comes in white and in various widths). This stuff isn’t cheap, but it’s supposed to be pretty fantastic and I’ll be watching it closely over the next few months to see how it holds up.
Installed a Maxxair roof vent/fan –
Although we already had a Maxxair fan installed over our bathroom, it failed and we found another model that we like better. The old one was the 7000-series unit with the big, long hood over it. The big advantage of it was that the vent could be opened in the rain and while driving, neither of which we do. And believe me when I tell you that the old one was almost impossible to clean due to its complexity.
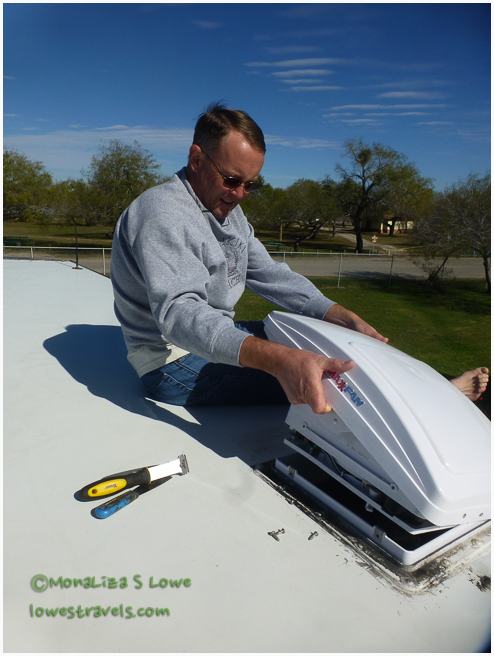
The new vent/fan is the Maxxair 4500K, which is pretty much a direct replacement for the standard roof vent opening. It also has a great remote for VCI’s (vertically-challenged individuals – one lives here), with multiple controls and thermostatic operation.
As you may know, the toughest part of this job is to get the old fan and caulk removed without tearing up the roof. After that, the project was very straight-forward, and the instructions that came with the unit were easy to follow. It works great, and we like the “smoked” cover because it lets some light into the bathroom during the day.
Removed Diamond Shield protectant –
Our coach came new with a product called Diamond Shield installed on the front cap, which protects the paint from rock chips and other debris. The trouble is, after several years it was beginning to deteriorate and look bad. After lots of research I decided to remove it. I was lucky to get the plastic material off in large sections without it falling apart, but removing the adhesive remaining on the paint turned into a long and tough project.


I have finally gotten all of the adhesive off without damaging the paint. I plan to write a post dedicated to this project, since it has been a topic of much debate on some of the RV forums.

Whew Steve, you’ve been a busy boy and I can just imagine ML stalking those birds. Last week we installed a Maxair vent cover too. Had to wait for this weather to break 😉
We are “part timers” who take long trips in a fifth wheel and I can relate to the maintenance issues. It seems like there’s always something that needs to be taken care of. Looking forward to seeing where your travels take you this year.
RV tires and batteries, the great wallet breakers! We had both in 2014. And thanks for reminding me I’m due for oil change and lube 🙂
Always glad to help! 😉
We recently learned about cabinet insulation from John and Pam too and used up some leftover insulation on a couple of cabinets that contain food or liquor. What a great idea!
What an interesting post Steve… you should do more of these…. do you intend to replace the shield?
Most people who remove it don’t replace it, and I don’t plan to either. It just looks
too shabby after only 3-4 years.
Steve,
Hey, we are only 214 miles from you in San Antonio trying to stay warm for the winter. Last year we wintered back home in WV, due to family issues, and it was no fun at all. I will gladly take the wet 40 degree weather over the snow and -10 degree weather we had in WV last year.
Does the insulation trick help with the condensation that accumulates in the cabinets during cold weather? We too also have to replace our batteries since I never really kept them watered as well as I should have. I have read that many like the Interstate batteries over other brands and take it you do to since that is what you used.
I would also be interested in your post about removing the Diamond Shield since our Fleetwood Discovery 40G has it too and it is starting to crack.
Coming from El Paso to San Antonio over I-10, we got two rock chips on our RV windshield and three in our van’s windshield, so have that to get fixed too. I think I am going to try the Rain-X windshield repair kit first and if that doesn’t fix them then a call to the insurance company I guess.
Glad to hear you are getting your maintenance done.
Don, Misty, and Kids…
LivelyRV
Wow, sorry to hear about your windshields, what rotten luck! Another reason
for me to hate that stretch of I-10.
We don’t have issues with condensation in our cabinets,so it’s difficult to
answer your question. Maybe you could do just one or two and see if it helps?
Our RV came with Interstate batteries as the coach batteries, and I decided to
replace them with the same ones since they worked so well for many years. The
chassis batteries were a different brand, but I switched them over to Interstates
with the same CCA ratings. I think they’re good batteries. Good luck with yours!
Maybe you could nip over to Scotland and do some maintenance on my much smaller van when you’ve finished? Please?
You take care of my airfare, and consider it done! 🙂
Maxxair….the berries!!! Betsy shining like a brand new nickle….I can hear her, “where next Lowes, I’m ready!”
I guess I need to get John working a little harder. It seems he is having way too much fun that doesn’t involve any MH maintenance:) Love your insulation! I think it makes a big difference when the sun hits the side.
Wow, you have been busy! Your coach looks wonderful. Good seeing you both today. We had a wonderful time.
Susan & Bob
Wow that’s a lot accomplished. You must feel great. David has done most of these but not all at one time. I’m passing this post on to him so he can see how your methods compare. Well done. Of course I’d rather be with Mona Liza the terrorist! 🙂
Hi Sherry, I would certainly prefer not to do so many projects at once, but we’ve found
that it can sometimes be difficult to find parks that let us do work on the coach. And
to be honest, I’d rather not take time out to do those things while we’re moving along
and trying to see everything we can. After all, I’d hate to have Mona Liza miss a bird
because she was handing me a tool!
What a great idea about insulating the cabinets…thanks!
Whoopee! So glad you guys are meandering down here to “the Texas Valley”! I am looking so forward to seeing you again! Alaska was a lot of miles ago. Steve, it is always good to see your maintenance postings. It, too, is good that ML is out birding! We have a few sunny days coming and then the Angels will cry for a couple of days. Be safe.
I am also amazed at how much work you do yourself on your MH. These are some great tips Steve. I will pass them along to Terry, because I would be outside terrorizing the birds with MonaLiza. 😉
I finally finished the last item on my list yesterday – apply the roof protectant. It
felt so good to just site down outside and relax without having those projects hanging
over my head! Take care, and say hello to Terry…
It must feel like such a sense of accomplishment to complete these projects. I know I feel that way each time I give the inside of the rig a good cleaning. Thanks again for all your great tips Steve. Have a wonderful week!
That’s all greek to me. 🙂 But I always enjoy reading and seeing Steve take over the blog ‘ s centerstage. 🙂
Steve, you are so motivated and talented! And perfectionistic about your work, which is an excellent quality in my estimation. 😉 We have a Maxxair fan but I wish it was the one with the remote control because it’s too high for me to reach!
Thank you for the kind comment, Laurel! It feels good to get just about everything done (I don’t think we’re ever really done, are we?), and we’re excited to get back out on the road. We still have a month to go in Mission, TX though, and of course ML is excited to met a new bunch of feathered friends there. Glad you’re enjoying the California coastline!
Lots of hard work, Steve. I guess there’s just as much maintenance on on RV as there is on house. I hadn’t really considered that before. Nice of you to give Mona Liza time out with her birds, whilst you work your fingers to the bone. 🙂
I’m curious, Steve, whether by insulating the cabinets you ended up with any behind the insulation condensation?
Good question. I had not noticed any condensation on the inside of
the insulation, but really didn’t check between the insulation and
the wall. Today was perfect for taking a look – we woke up to
condensation all over the inside of the coach glass.
I found no condensation at all between the insulation and the wall.
I’ve heard no reports of that being a problem, so it bodes well for
this project. I haven’t been able to confirm how much the insulation
lowers the temperature within the cabinets, and I guess I’d just say
it certainly can’t hurt and it looks kind of cool too.
~Steve
Steve, Thanks for the comeback. I have wondered about that. Last winter we spent right on the Oregon Coast and mold and mildew were a big problem for some of the other volunteers. We did not have the same problem but we not done what you did. I have considered doing the same, but after coming from an area that had SO MUCH humidity I was loathe to RISK a problem. We might try the same here. And it would be a functional change for summer and winter. THANKS AGAIN, Peter